Gas lines
It’s possible to leak various gases into the preparation chambers, typically to a maximum pressure in the UHV chamber of 5e-5mBar. The infrastructure for this is mostly already existing. Gas lines are pumped independently of the main chamber pumps, using the same system as the fast entry source ports.
Warning
Since the system also serves the source ports, always take care to isolate sections that need to remain in HV/UHV before you start working on the gaslines. Remember to re-open when you’ve finished.
Procedure for filling gas lines
The gas lines are typically configured as shown here:

- Your process will be:
Connect the bottle and regulator
Pump the entire line to rough vacuum up to the closed bottle valve (V1,V3,V4 open)
Pump the entire line to high vacuum up to the closed bottle valve (V2,V3,V4 open)
Close V3
Open the bottle valve and fill the line to the desired pressure (max 1.5 bar)
Close V4 and remove the bottle from the endstation
See the following for details of this process.
1. Attach a regulator to the bottle and gas line
(If you have a ‘mini-mix’ style bottle, first read the discussion about those bottles further down the page!)
The gas lines are typically filled to 1bar, and should never be filled to more than 1.5bar. To faciliate this a regulator is needed to step down the bottle pressure. Single stage regulators are usually available at the beamline, otherwise can be obtained from the gas responsible at MAX-IV (currently Ernesto Regaño). Always check that the regulator has a gasket on the bottle side! Internally these regulators look like this:
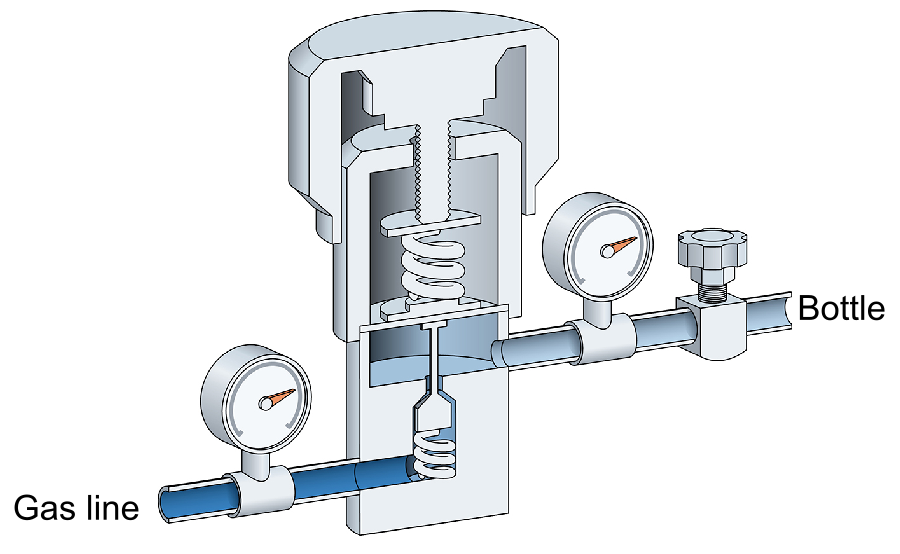
The first, large gauge on on the regulator will always read the input pressure, regardless of the state of the valves on the regulator. The second, smaller gauge reads the output pressure which is controlled by the large knob.
Attach the regulator to the gas bottle, leaving both valves of the regulator fully open
2. Pump the line to low vacuum
Close valves V1 and V2 (and all other valves on that manifold)
Open V3 and V4
Bypass the vacuum interlock for the chamber you’re working on (prep sec or prep main). Several gauge icons will turn purple when the bypass is active.

Open valve V1, and wait for the pressure to reach below 3e-1mBar. The pressure reading is displayed on the same control panel you used to activate the bypass. If the pressure is not reached within 60s, investigate the line for leaks.
3. Pump the line to high vacuum
Close valve V1, then gently open valve V2 while watching the pressure in front of the turbo (also displayed on the same control panel). Try to open slowly enough to keep the pressure below 2e-4mBar.
Wait for a good pressure. This may involve baking the lines, but as a general guide the level of vacuum you need is indicated below:
Purity |
Vacuum required |
|---|---|
4.0 (99.99%) |
1e-5 mBar |
5.0 (99.999%) |
1e-6 mBar |
6.0 (99.999%) |
1e-7 mBar |
To see this, assume that we fill the line with argon to a pressure of 1 bar, and that the line is initially perfectly clean. At a 4.0 bottle purity of 99.998%, the partial pressure of ‘not argon’ after we fill is 1000 * (1-0.99998) = 2e-2 mBar. If the line is pumped to 1e-5 mBar or lower, it will contribute less than 0.1% to the total impurity content of the filled gas.
4. Open the bottle and fill the line
Close V2, V3, V4 and all regulator valves
Open the bottle valve
Open the large regulator knob until the second, smaller gauge reads the gas pressure you want (typically 1 Bar).
Open the second regulator valve to fill your gas line up to closed V4
Open V4 to fill the gas line up to the experimental chamber
5. Remove the bottle
Warning
This procedure only applies for inert gases, since some will be released to air. Dangerous gases must be evacuated through the roughing pump before disconnecting the bottle, which today is not possible without also emptying the gas line.
Close V4
Close all regulator valves
Close the bottle valve (unless using a mini-mix bottle)
Remove the bottle from the endstation and store it in the gas cabinet behind the Bloch hutches
Mini-mix style bottles
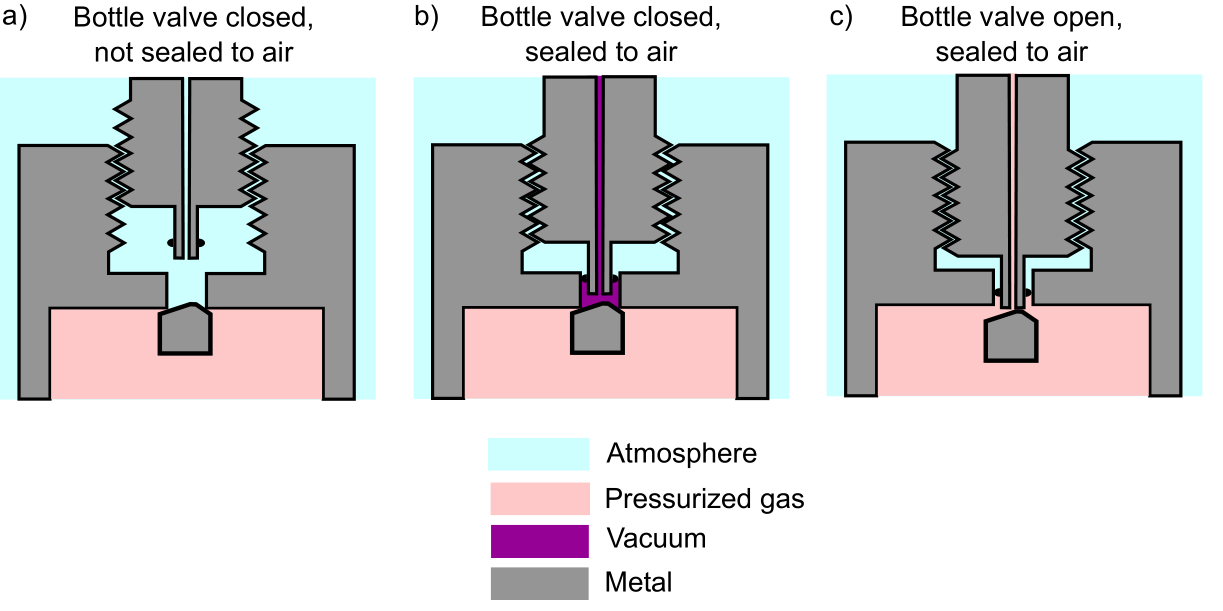
Standard gas bottles have an external valve and are fairly easy to understand. However it is often the case that small quantities of gas are provided in ‘mini mix’ gas bottles, and these are a little strange. The valve is internal, and its state is determined by how much you screw in the regulator. Schematically they look something like this:
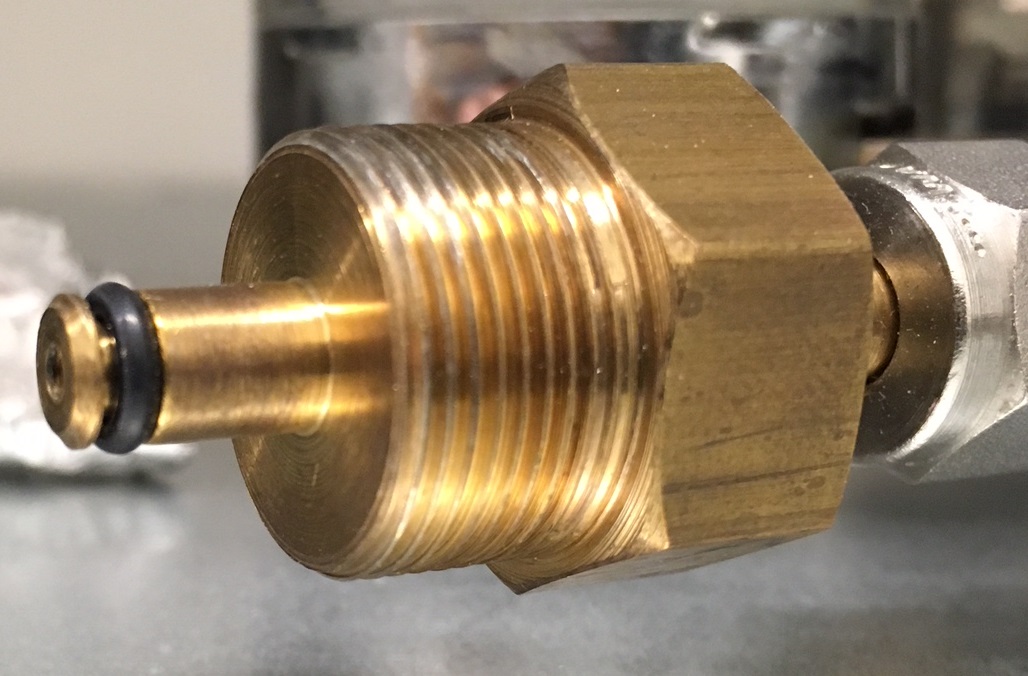
Before connecting a regulator to a MiniMix bottle, always check that it has a viton gasket:
Initially attach the bottle to the regulator by two full turns (no more, no less). This corresponds to the middle panel in the schematic above, where the connection is sealed but the bottle valve is still closed. If you go too far, you will open the bottle valve. In this case, remove the bottle from the regulator and try again.
Once the line is evacuated up to the valve, screw in the bottle two more turns to open the internal valve. You will know you’ve opened the bottle when you see the first stage pressure reading on the regulator rise to bottle pressure.